EASY DIY Fall Wall Art with Dry Flowers
On this post you will learn how to add a touch of autumn to your wall with a simple fall wall art decor. This Easy Fall DIY can be customize easily with the flowers you are most fond of.
But today we have something so special! I am so excited to be joining KariAnne of Thistlewood Farm and an amazing group of bloggers doing a fun Fall Hop! KariAnne has been the most amazing mentor in guiding my blogging journey. I am so grateful!
Links in this article are affiliate links and if you click on them, we will receive a small commission at no additional cost to you! Clicking and purchasing helps to support this blog and all of the home and garden posts we bring to you! Click here for full disclosure
If you are joining from Misty Nichols, Back Porch Bliss, Thank you! What a fun Pumpkin Topiary and only Five Simple Steps!
If you are joining from Annemarie Schumacher, Thank you so much!
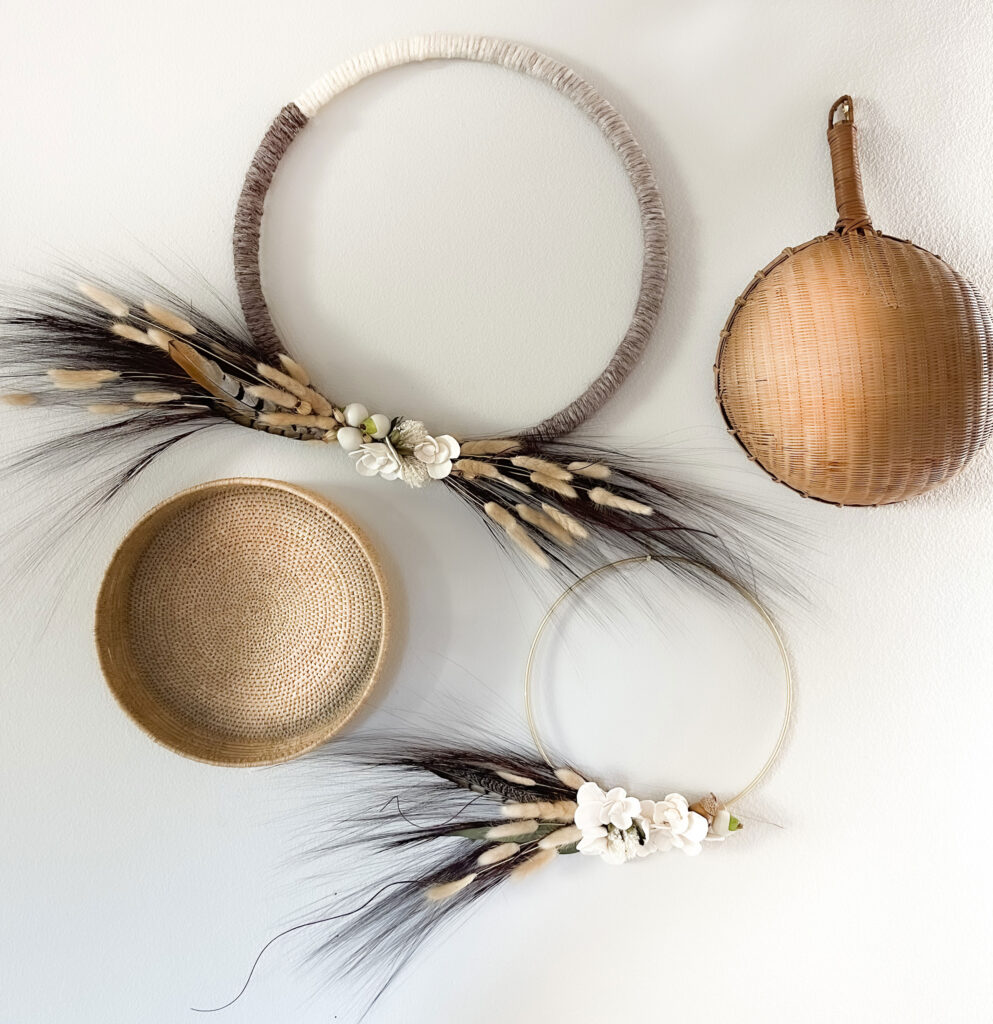
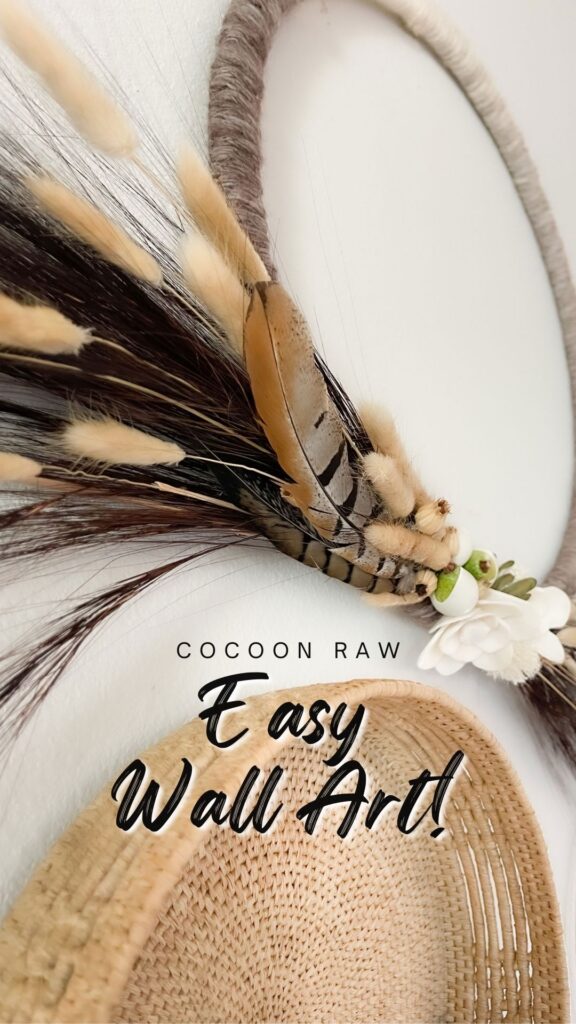
The fall wall art is made of dry flowers and dry grasses, which work well as an organic backdrop of vintage baskets. A little tip; keeping the selections simple and monochromatic with minimal accents will let the textures and shapes be the star! Let’s get going on making these elegant pieces!
You want to learn more about Autumn natural decorations inspired by nature decor ideas. Check out ‘11 BEST NATURE DECOR IDEAS FOR FALL TO GET INSPIRED!
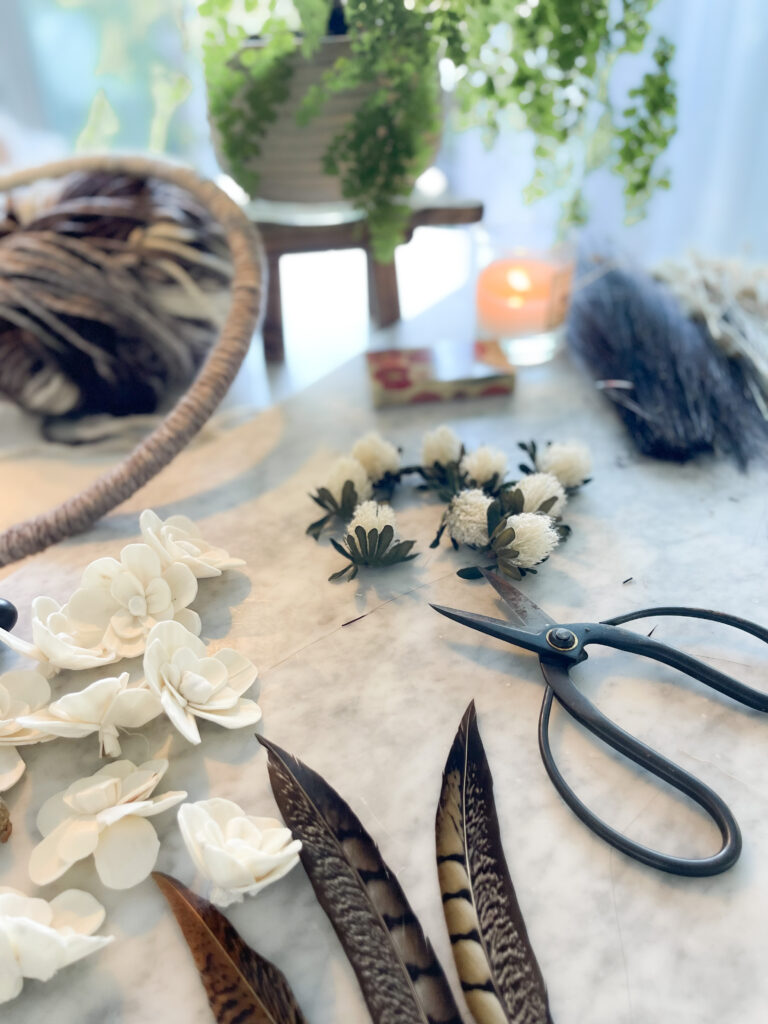
SUPPLIES
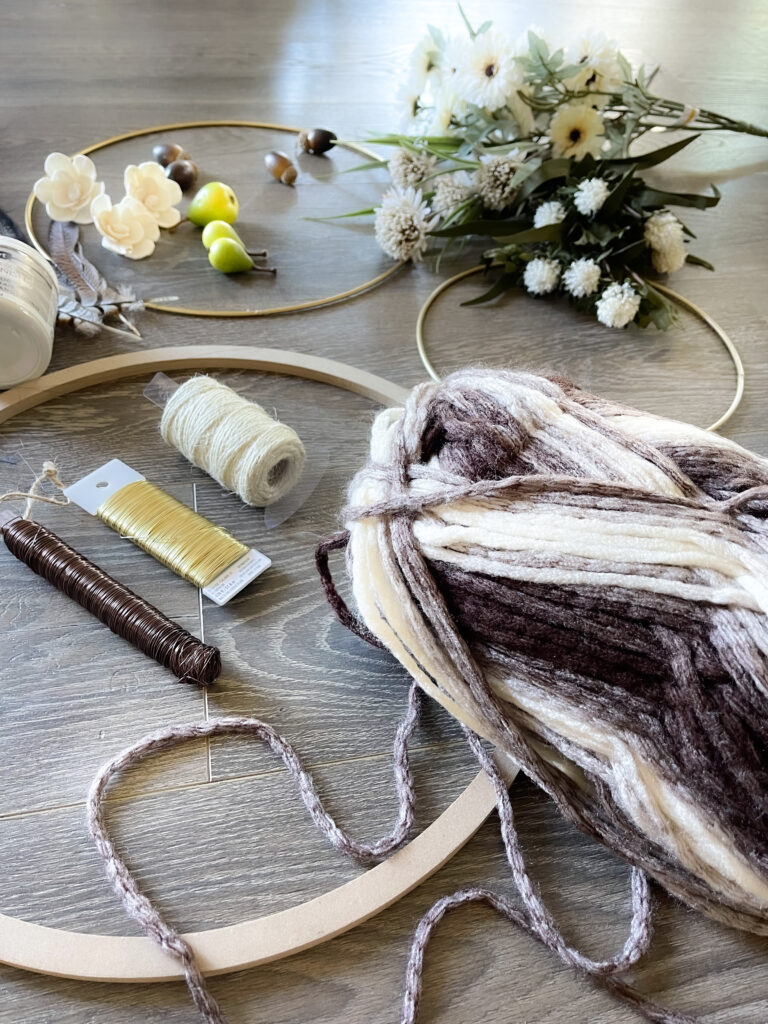
I recommend you gather your supplies first so you have a clear direction on the look you want, whether you desire to add something different as an accent or to use some supplies you already have available.
- Dry Grass Dark Chocolate brown color
- Dry White Bunny Tail
- Curled Twigs – Very thin
- Fusion Mineral Paint – Champlain Color (you can use any neutral color that goes with your decor)
- Yarn / Laine (I selected this yarn, because it gives you a gradient effect)
- Hot Glue Gun
- Hot Glue Gun Sticks
- Leather or Suede piece of material
- Decor Acorns
- Naturals Bowl Filler Flowers
- 14″ Metal Floral Hoop
- 24″ Wood Hoop
- Small foam pears
- Paper Plate
- Long green leaves (I used the ones that came with the white flower buds)
SHOP FOR MORE BEAUTIFUL NATURE INSPIRED DESIGN


Alternate Materials
Here are some options if you feel it is better to use instead of a hot glue gun or you want other flowers. I have shown some flower options on the image to show the simplicity of them to keep a monochromatic and elegant look.
- Craft wire if you wish to use it vs. a hot glue gun.
- Twine if you wish to hang the art instead of using a picture hanger.
- Silk Flowers
INSTRUCTIONS FOR THE FALL WALL ART DISPLAY
We have two different art decor pieces that will complement each other.
The elegant wall collage will also have the addition of vintage baskets or other wall art of your choice.
Before you Start with the Fall Wall Art itself!
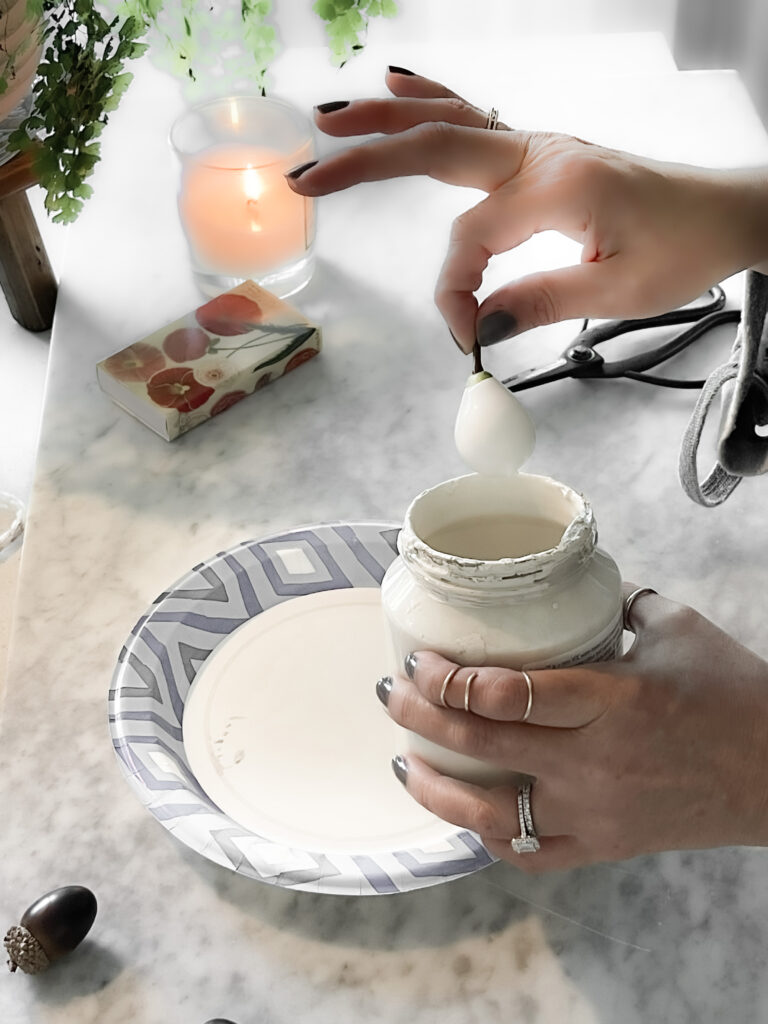
Go ahead and dip your pear into the paint, place on a paper plate to dry with the side you are going to glue down facing the plate.
LARGE YARN FALL WALL ART
Begin with the Large Hoop with Yarn

- Take the yarn and glue the beginning to the back. Begin to wrap the yarn around the hoop and go on top of the glue to make the yarn stay in place. Every so often make sure to place a little glue to keep the yarn from moving around.
This gradient yarn is so beautiful and will provide so much dimension.
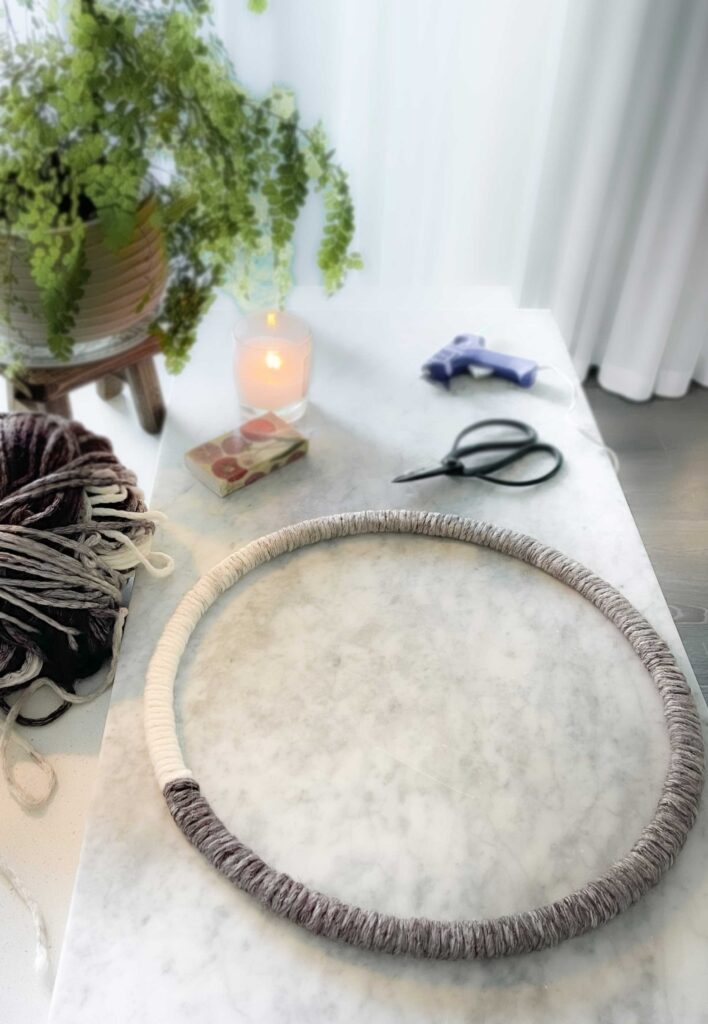
2. Place a little glue at end on your last wrap to finish it. You can use a toothpick to prevent the glue to get on the adjacent yarns.
Layer the Grass and Bunny Tails
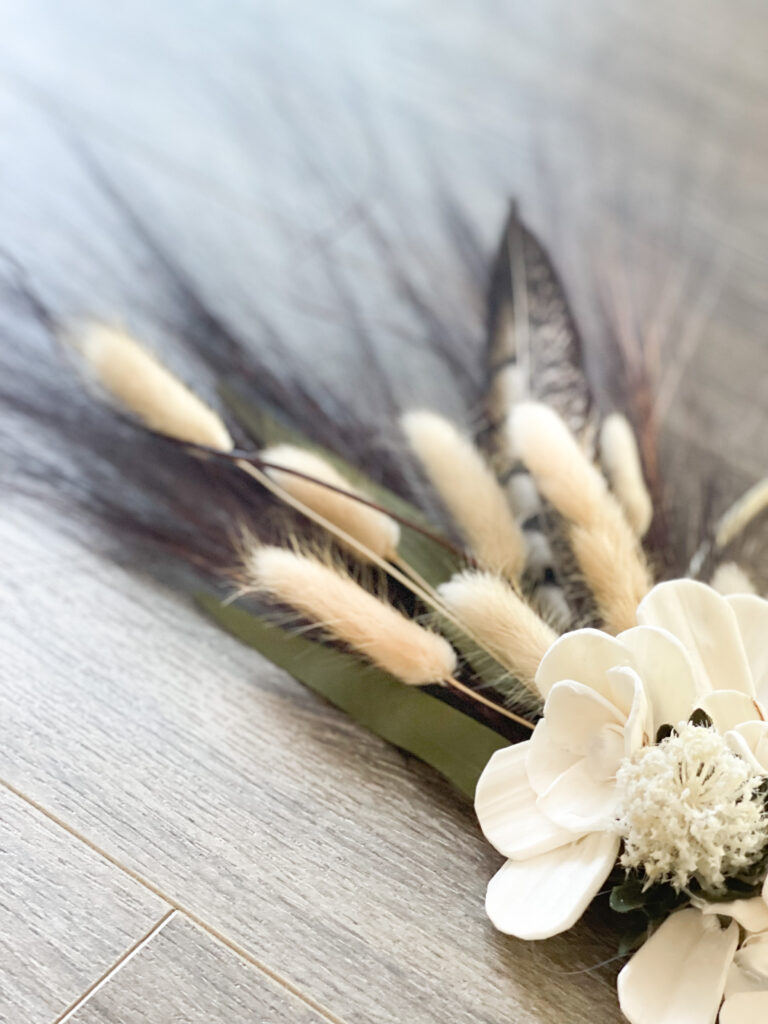
- Cut grass and bunny tails to different length, 3 different lengths at least.
- Start layering the grass and bunny tails.
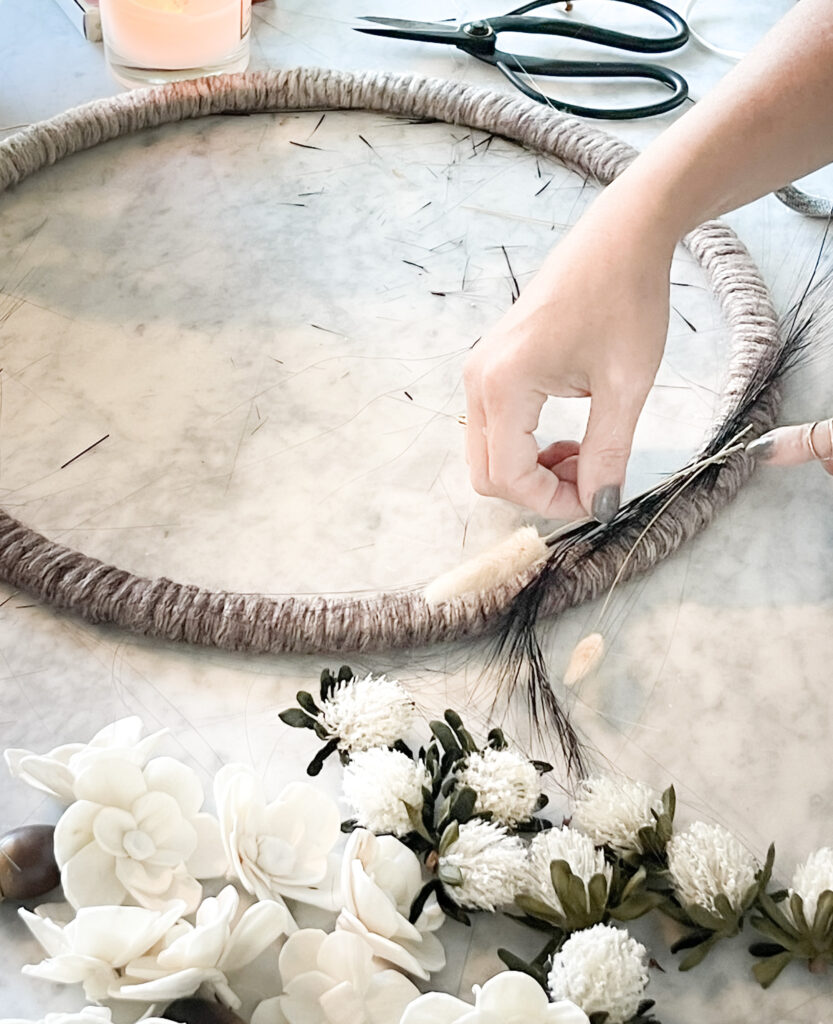
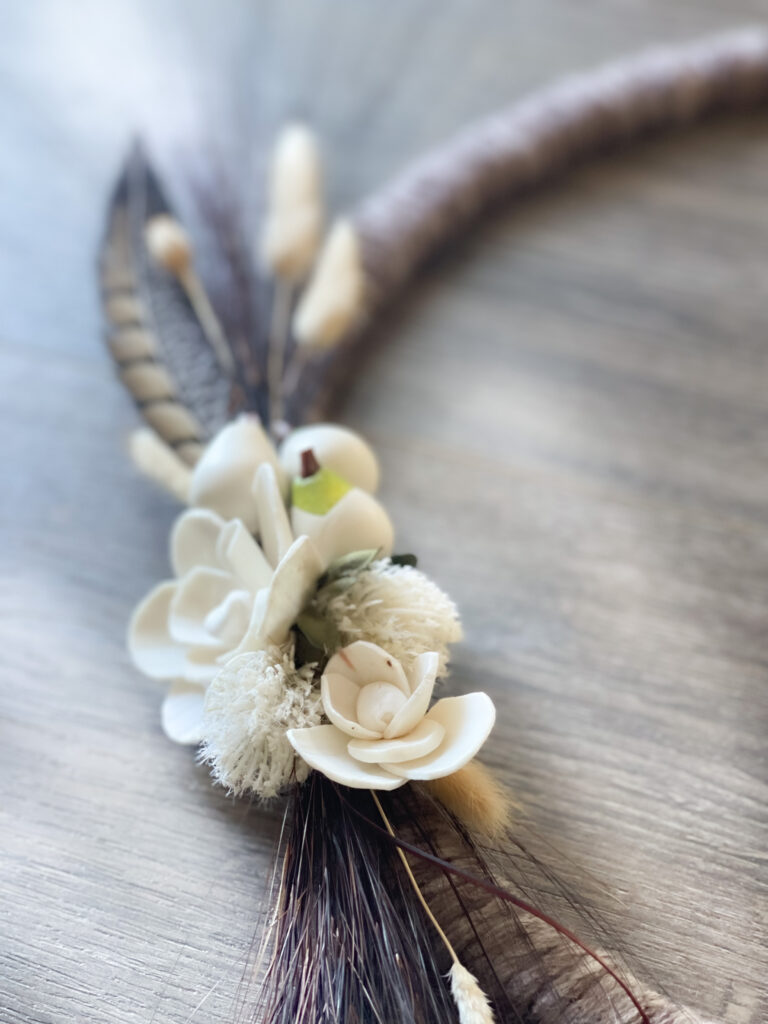
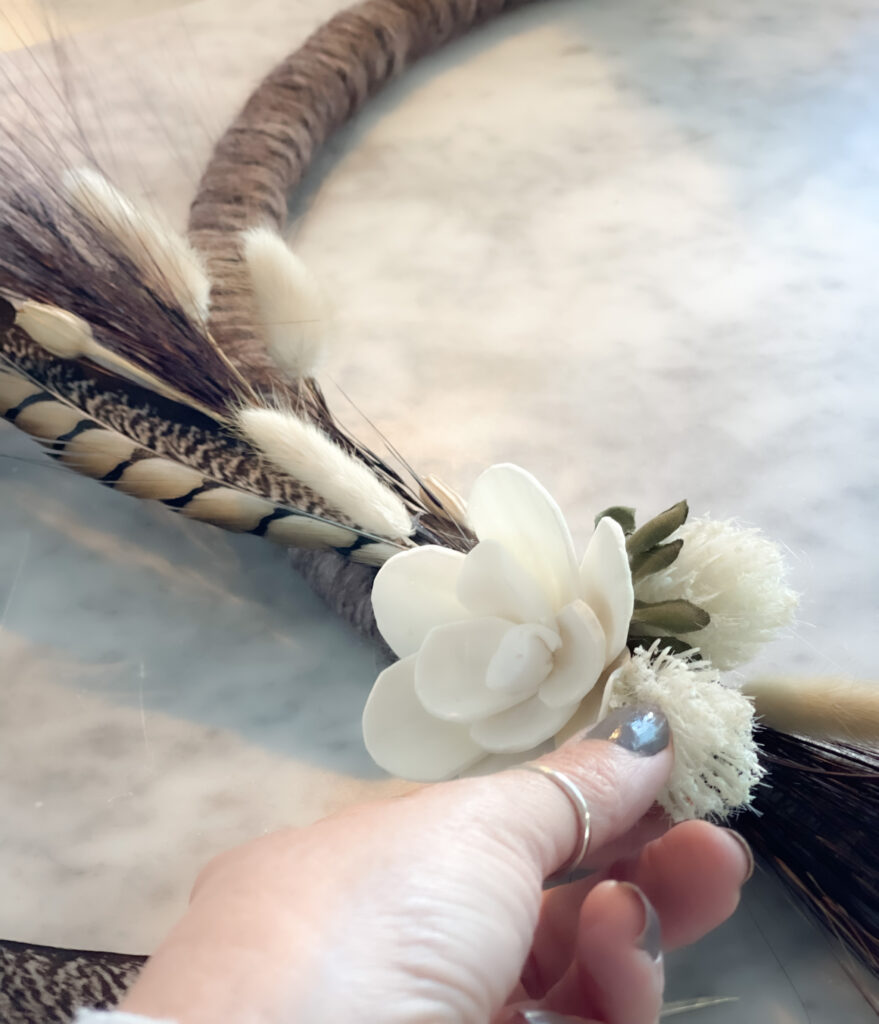
Apply Flowers
3. Cut the back of the flowers so that they are flat and it is easier to glue to the hoop.
4.. Apply your white flowers in the center the large fall wall art decor.
Add Feather and Accent Pieces
6. Begin building the sides with layers of grass, twigs and on top more of the bunny tails.
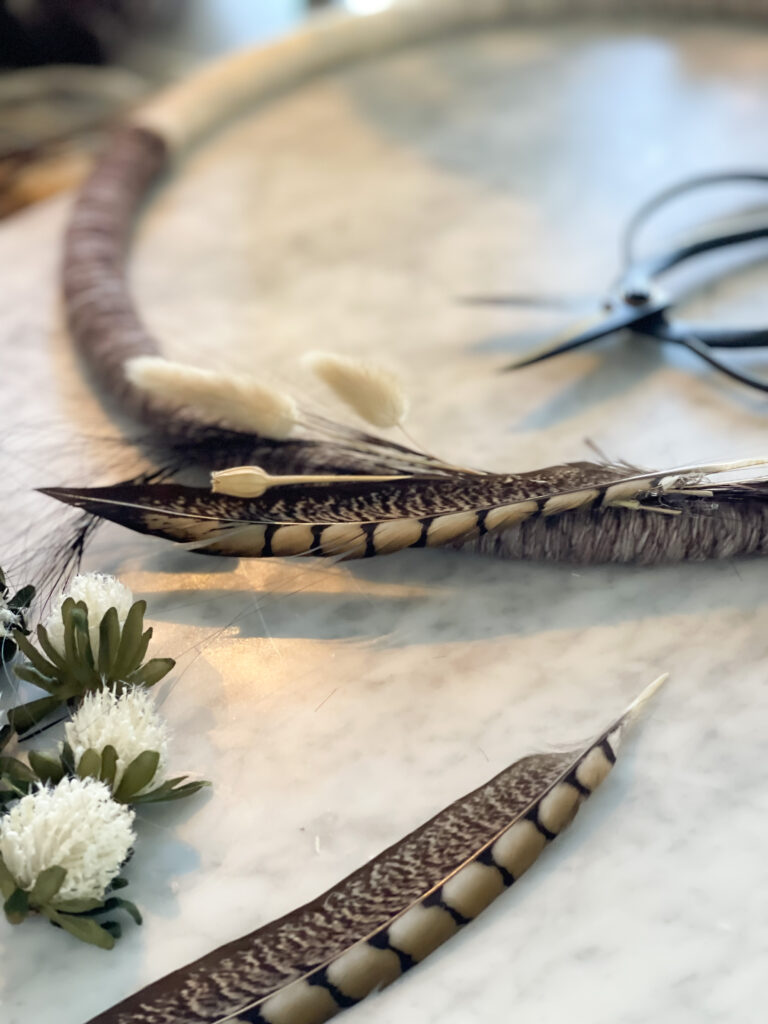
7. Add the feather on one side only, as well as the pears and acorn in order to bring interest to the piece. Make sure to place the feather before the bunny tails and twig. Keep building the layers! This is the fun part!
8. Break apart the flowers leaving the small center to get a custom look to the shape you make. Add the petals to the sides to keep building it out.
9. After it is almost completed, take a look and add what you think is needed, like more pears if you need more color in the piece. The green makes a beautiful accent color!
For great tips on decorating, read my post ‘BEST WAYS OF DECORATING WITH NATURAL ELEMENTS for tips you should know about!.
10.. A little tip: As you build your art, make sure it is not symmetrical, I keep the acorn and pear to one side only. This will bring interest to the piece and make it look more hand made and not a mass produced piece.
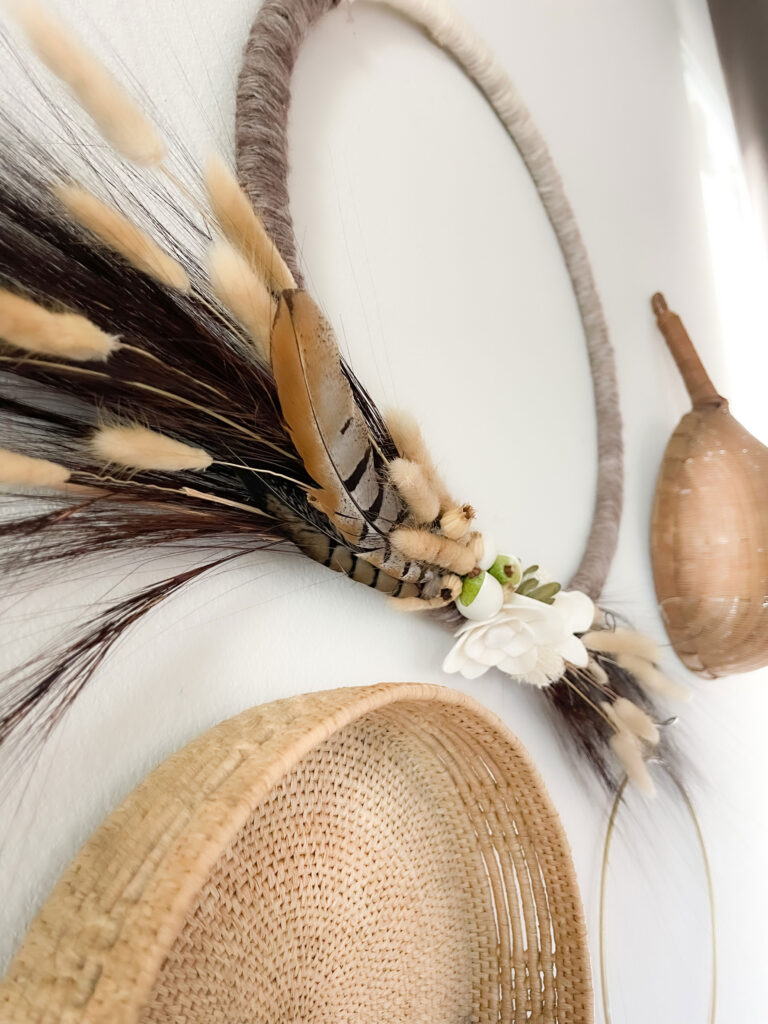
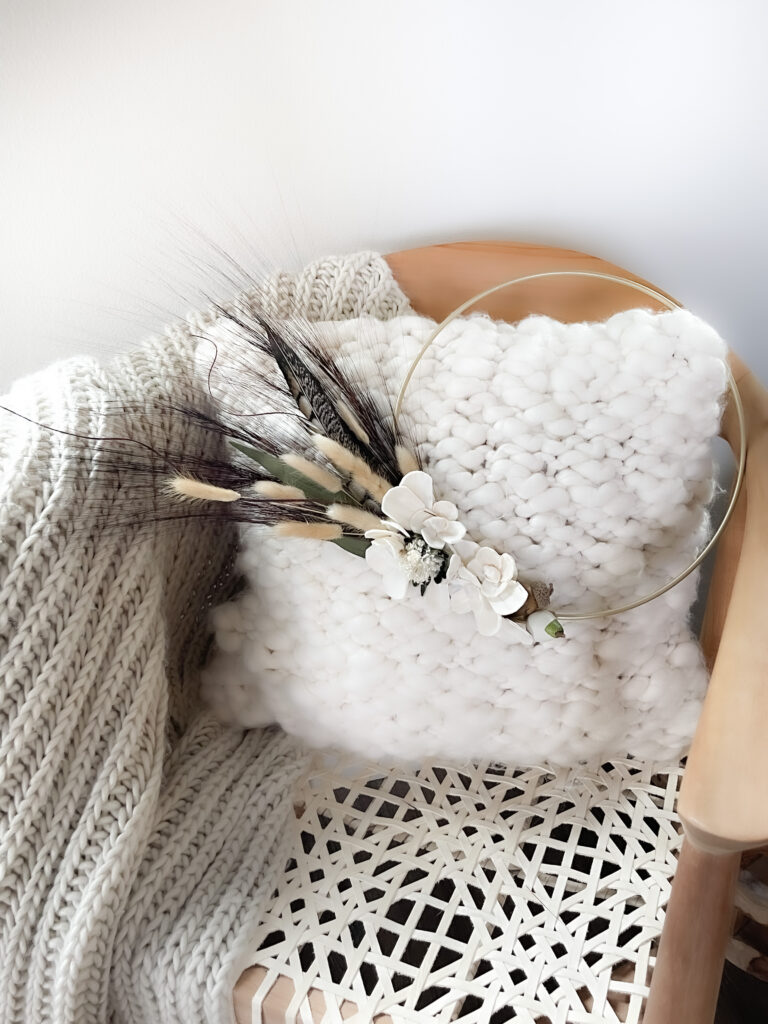
Small Metal Fall Wall Art
You are essentially following the same steps above for the large fall wall art piece, except this one is going to be completely asymmetrical, just one side will have the decor.
- The metal hoop is smaller to balance the overall look.
- The first thing to do is to apply the leather. I used suede, found it to be more porous and the decor attached better. But you could use fabric if it is thick enough to make a base for you to attach the decor.
This is an important step or you will not be able to attach your arrangement firmly.
Check out my blog post ‘Easy Steps to Create a Cozy Home’.
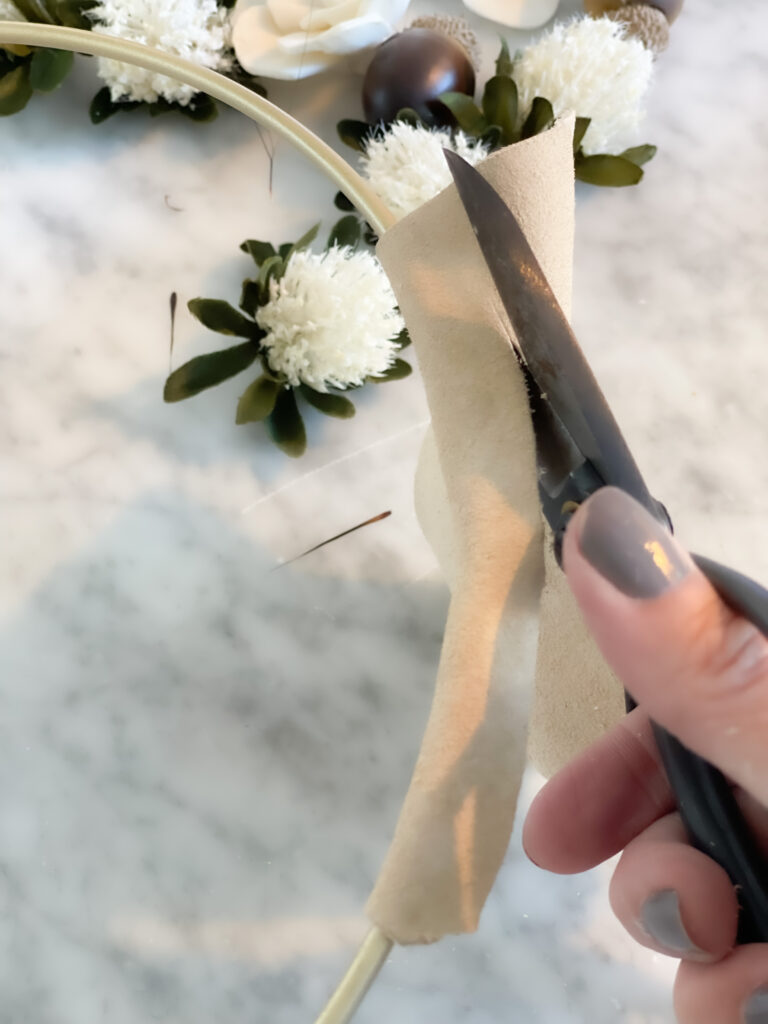
2. Glue the two sides of the suede together. Cut a small slit on one side in the center to be able to curve the suede or leather material.
3. Follow the steps above to layer your elements.
Placement of the Fall Wall Art Display
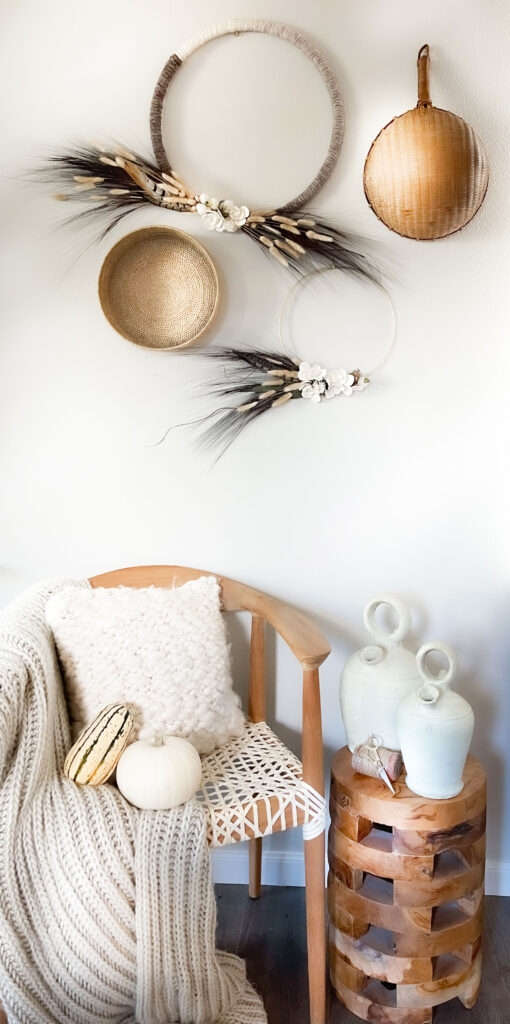
- It is so important to make your fall wall art layout look balanced.
2. I also love using organic materials against this new fall wall art. Displaying the baskets tells a story, as though you used them to harvest the flowers displayed.
Telling the story visually means everything to me!
3. When placing your metal hoop, the side with the grass decor should face toward basket and not the outside of the fall wall art display. This will keep the eye towards your display instead of away from it. Add a little angle to it so that it is not totally horizontal.
4. For the larger yarn wall art you made, place the grasses to the bottom, but a little on an angle. This will frame the whole piece, but not cut it visually in half.
Check out my post ‘HOW TO GET INSPIRED to Decorate with Nature in Mind!.
ENJOY FALL!
Which brings me to Annemarie Schumacher, Make Every Day an Event. If you are visiting from Annemarie’s Blog, thank you so much! Check out her great post ,’Fall Tabletop Trends’.
Enjoy your new Fall Wall Decor and have the most beautiful Autumn Season!
Your Cocoon Awaits You,
Stay Creative!
IF YOU ENJOYED THIS POST, PLEASE PIN BELOW!
Don’t Leave Yet!
Take a look at some more amazing DIY’s
Gallery Wall Styling in 3 Simple and Easy Ways
How To Transition Your Home From Summer To Fall: 7 Simple Tips
Handmade Ceramic Bowls Rustic Autumn Table


So pretty!! Great tutorial!!
Thank you so much Christin!
So pretty!
Thank you Carrie!
This is beautiful, Melba … great instruction and gorgeous photography! xo
Juliet, thank you so much! I really enjoyed taking the photos.
What a beautiful wreath!
Thank you so much!
This is absolutely gorgeous, Melba! So sophisticated!
Thanks Marieza! I am so enjoying on my living room! Finally getting into the Autumn Season!
What a great project Melba!!! I love how you wrapped the frame!!!
Thanks Crystal! I am addicted to yarns, but am awful at knitting. Best other option is craft!
Very beautiful and creative!
Thank you so much Dara!
This is such a lovely piece of art Melba! The neutral colors speak to me! Pinned 🙂
Thank you so much Cindy! I love neutrals so much!
Melba, I really like the wrapped ring and neutral colors you used, so pretty! Thank you for sharing!
Misty, Thanks for the comment! The gradient yarn was definitely my inspiration.
So elegant with a cool vibe! Great tutorial! It was such a fun blog hop. Glad to be a part of it! ~Missy
Thanks Missy! I agree, this was a super fun blog hop!
Wow! Your wreaths are amazing! I love them, especially the feathers.
Thanks Renae! I can’t resist using great looking feathers.
This is unique and elegant, like you! Happy Fall!
Awwww! Marie! You are so sweet! I am learning so much from you my sweet friend! Happy Fall!
Your creations are gorgeous and they look spectacular on your wall.
Thank you so much Paula!
So petty and it’s natural, rustic and elegant. Great tutorial
Thanks Cindy! You know I am obsessed with natural elements!
Beautiful wreath and wall arrangement! Glad to see you on the hop!
Thank you Linda! The hop was super fun! Hope to do another one soon.